


[Scroll down for the english version of the recipe]
Quando una è furba, è furba.
I croissants e i pan au chocolat sono quei classici prodotti da forno che andrebbero realizzati, per semplificarsi moltissimo la vita, quando le temperature sono più basse di quelle normalmente presenti in estate.
Quando decido di farli io? In agosto.
A mia discolpa, posso dire che le temperature sono decisamente fuori target rispetto agli ultimi anni, molto più fresche. Però insomma… Se siete alle prime armi, magari aspettate settembre, ecco :D.
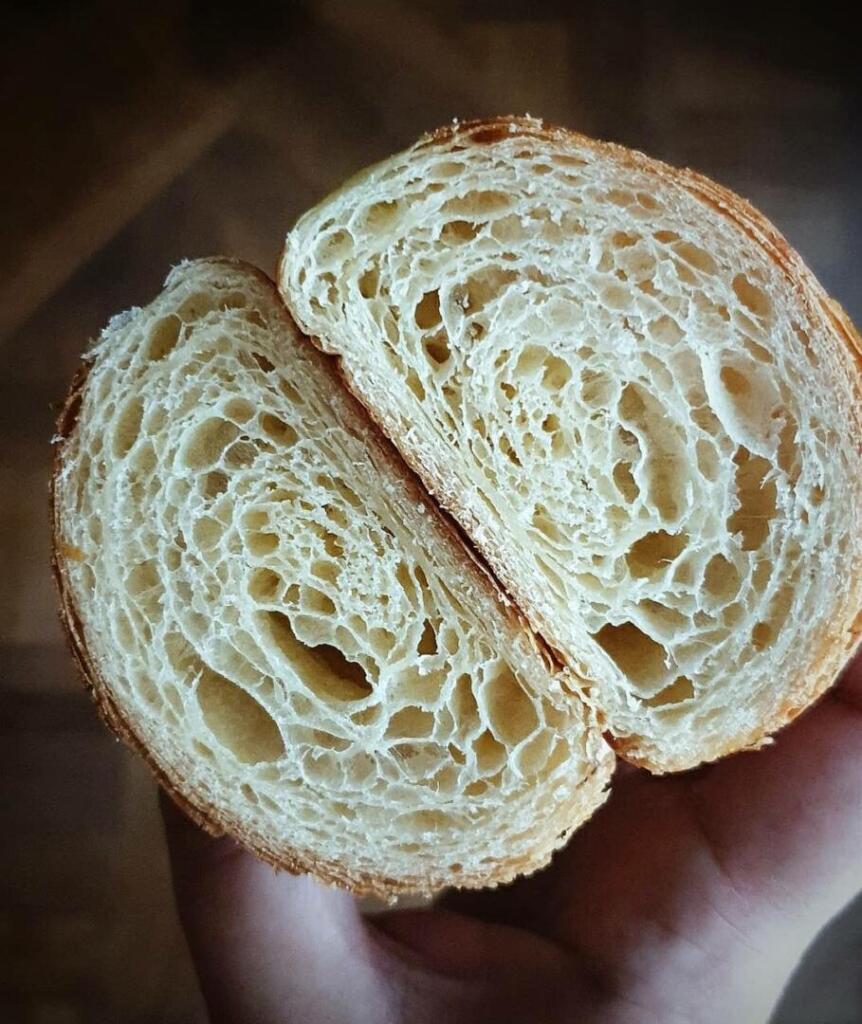
E’ importantissimo prendersi il giusto tempo ed usare il frigo il più possibile. Dobbiamo riuscire a gestire consistenza e temperatura del burro per sperare di ottenere dei croissant sfogliati. Se il burro è troppo caldo, tenderà a sciogliersi e fondersi con l’impasto. Se, di contro, è troppo freddo, potrebbe rompere la pasta quando lavorate. Ci vuole un pochino di manualità, ecco. Ma del resto se mai si prova, mai si acquisisce.
Però dai: alla fine non posso lamentarmi:

CROISSANT BICOLORI AL CIOCCOLATO (per 4 pain au chocolat e 8-9 croissants)
Ingredienti
per l’impasto base
500 g di farina per pane (12-13% proteine)
50 g di zucchero
10 g di sale
9 g di lievito di birra secco
160 g di latte
140 g di acqua
5 g di malto diastatico (se non lo avete, omettete semplicemente)
per sfogliare
250 g di burro
per l’impasto colorato
20% dell’impasto base
1 cucchiaio di cacao amaro in polvere
1 cucchiaio o poco più di latte
per farcire
barrette di cioccolato fondente (o semplici pezzetti di tavolette di cioccolato)
per lucidare
30 g di acqua
45 g di zucchero

Preparazione
**La sera prima**
IMPASTO BASE
Nella ciotola dell’impastatrice mettere tutti gli ingredienti (tranne il burro) e, col gancio ad uncino, iniziare ad impastare a velocità medio-bassa. Impostare la media velocità e lavorare per circa 5-6 minuti, fino a quando tutto l’impasto si attorciglierà completamente al gancio e la ciotola dovrà essere “pulita”. SI deve ottenere un impasto liscio e setoso.
IMPASTO AL CIOCCOLATO
Prendere la pasta base, pesarla, e rimuoverne circa il 20%. Saranno circa 200 g scarsi di pasta. Impastare velocemente l’impasto base, chiuderlo a palla, metterlo in una ciotola, coprire con pellicola e riporlo in frigo.
Prendere il panetto restante e rimetterlo nella ciotola dell’impastatrice. Preparare una crema con cacao e latte, mescolandoli. Unirli al panetto e, con lo stesso gancio usato prima, azionare la planetaria, impastando fino a che il panetto sarà di colore omogeneo (potete anche procedere a mano, se preferite).
Chiudere il panetto a palla, metterlo in una ciotola coprire con pellicola e riporlo in frigo.
PANETTO DI BURRO PER L’INCASSO
Prendere 2 fogli di carta forno ed adagiare al centro di uno di essi i 200 g di burro, tagliati a fette e messi in maniera da formare grossomodo un quadrato di circa 15-16 cm per lato. Mettere sopra il secondo foglio e, con l’aiuto del mattarello, battere il burro per renderlo omogeneo. Cercate di mantenere il più possibile la forma quadrata e regolare. Una volta ottenuto un foglio di burro, ripiegare i lembi della carta forno così da chiuderlo a pacchetto e riporlo in frigo fino al giorno seguente.

**Il giorno seguente**
INCASSO DEL BURRO E PIEGHE
Riprendere l’impasto base dal frigo e stenderlo largo quanto il panetto di burro per l’incasso e lungo il doppio (quindi circa 15-16 cm da un lato e 30-32 cm dall’altro).
Prendere il foglio di burro dal frigo, levare un foglio di carta forno e disporlo in una metà della sfoglia appena ottenuta.
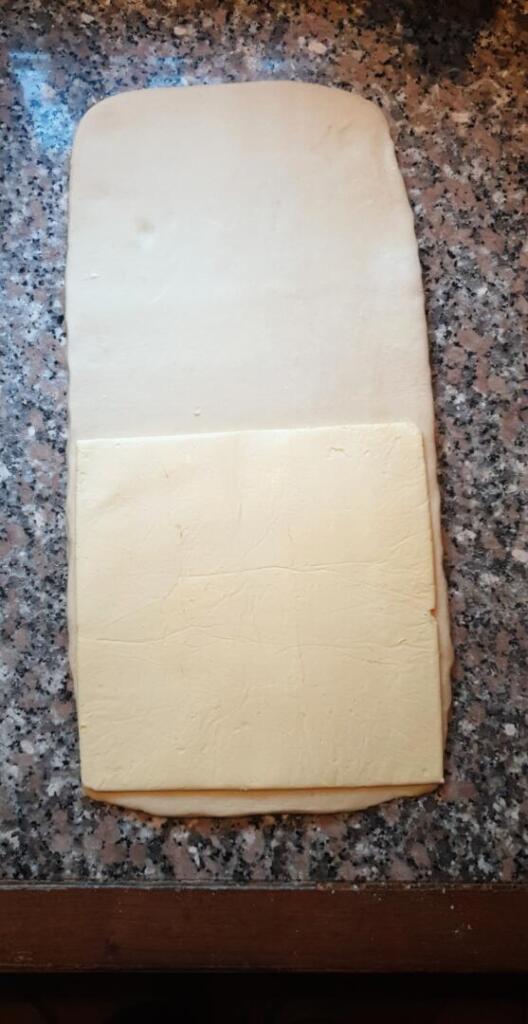
Rimuovere delicatamente l’altro foglio di carta, poi ripiegare la sfoglia eccedente sopra il panetto, incassandolo. Premere appena tutt’intorno per sigillare il burro all’interno, poi iniziare a stendere delicatamente l’impasto, sempre nel verso della lunghezza, ottenendo un rettangolo lungo e stretto. Idealmente sarà sempre largo sui 18 cm e lungo circa 50-60 cm.
Fate ora un giro di piega a 4 (o piega doppia)*. Riponete in frigo, coperto con pellicola, per 30 minuti.
Riprendere la pasta, avendo cura di disporla con l’apertura alla vostra destra e stendetela allo stesso modo: solo nel verso della lunghezza. Questa volta, basta fare una piega a 3* (basta ripiegare semplicemente metà impasto verso il centro e sovrapporre poi l’altra metà). Coprire e riporre di nuovo in frigo per 30 minuti.
* Potete vedere benissimo il procedimento in questo video QUI.

RENDERE L’IMPASTO BICOLORE E FORMARE I CORNETTI/PAIN AU CHOCOLAT
Prendere dal frigo l’impasto al cacao e stenderlo della stessa misura dell’impasto base che avete ancora in frigo (dovreste avere circa le dimensioni di un foglio a4).
Riprendere l’impasto base dal frigo, rimuovere eventuale farina in eccesso, spennellare appena appena un pochino di acqua sulla superficie e poi, delicatamente, appoggiare sopra l’impasto colorato, premendo delicatamente per farlo aderire.
A questo punto potete stendere l’impasto in entrambi i sensi, ottenendo una sfoglia di circa 28-30 cm da un lato e 60-65 cm dall’altro.
Rifilate appena tutto intorno per avere un rettangolo regolare.
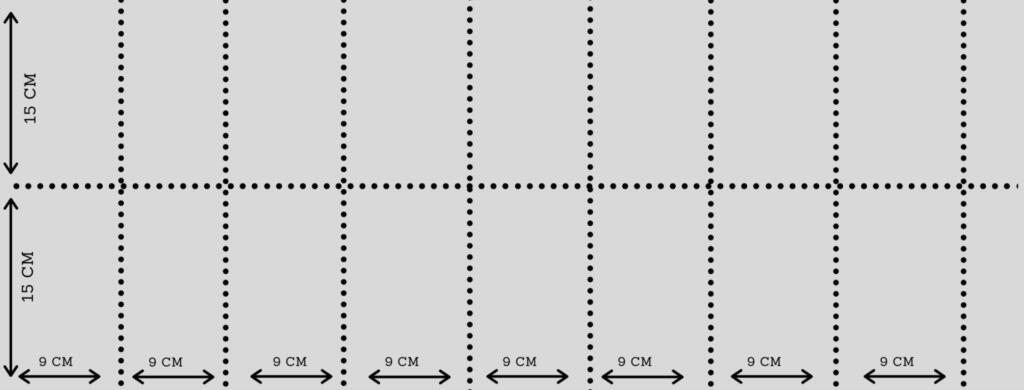
Se volete ottenere solo croissants, con un righello misurate la sfoglia e segnate il lato lungo ogni 10 cm (saranno le basi dei triangoli) e fate lo stesso dall’altro lato lungo, sfalsando di 5 cm la misurazione rispetto all’altra. Nello schema qui sotto sarà più chiaro 🙂 :

Se invece volete ottenere i pan au chocolat, allora le misure sono diverse, circa 9 x 15:
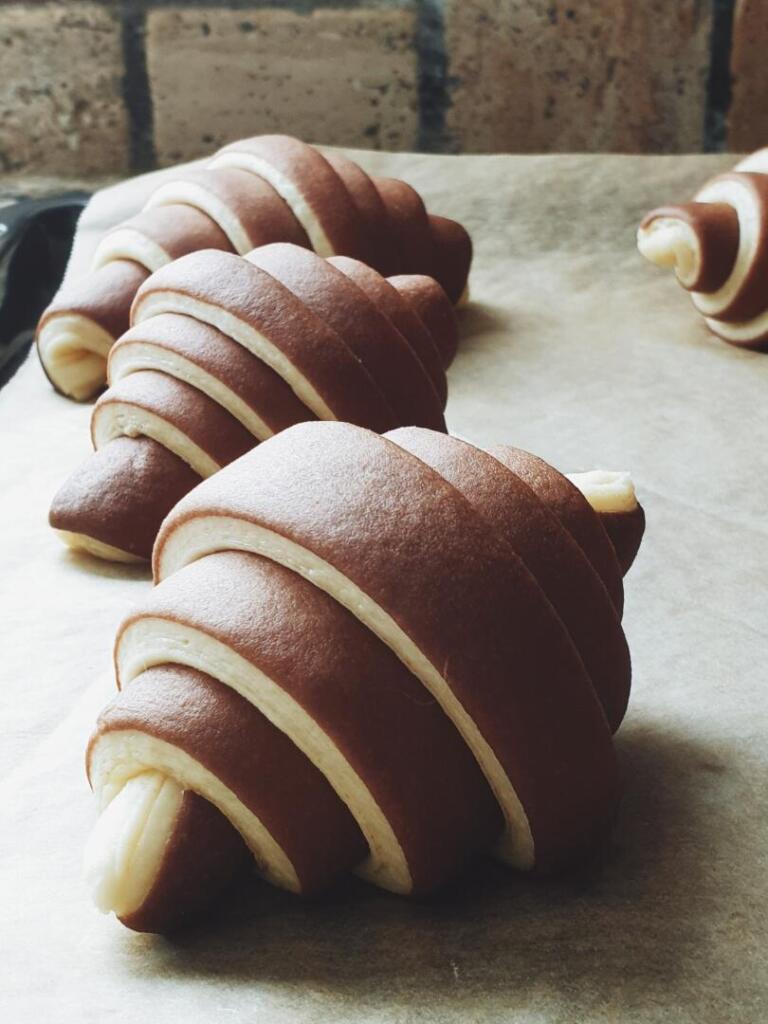
Una volta ottenuti i triangoli (per i croissants) disporli su una placca, coprirli con pellicola e riporli in frigo 15 minuti prima di farcirli di cioccolato, arrotolare e formare.
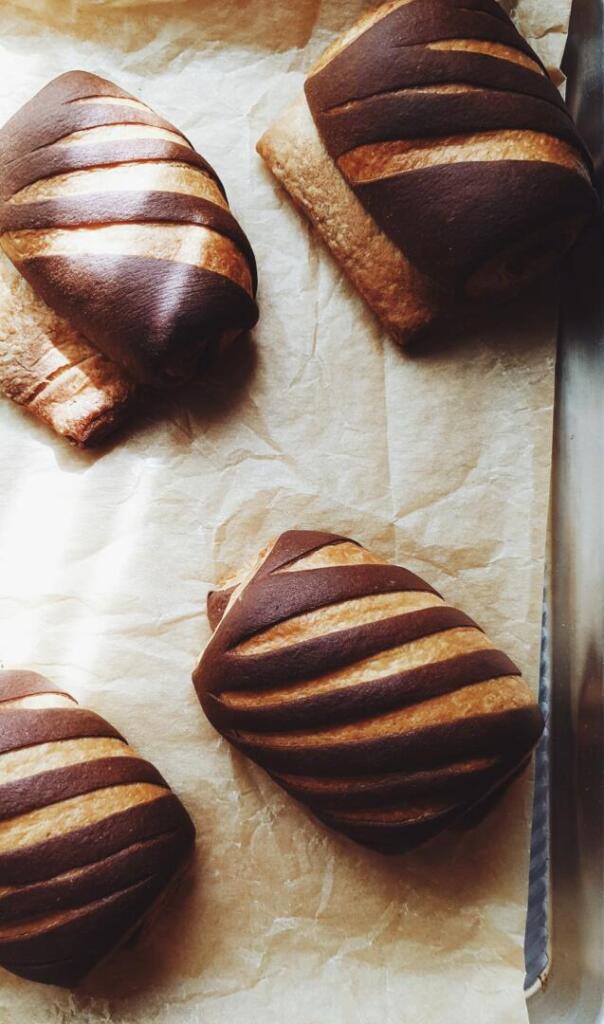
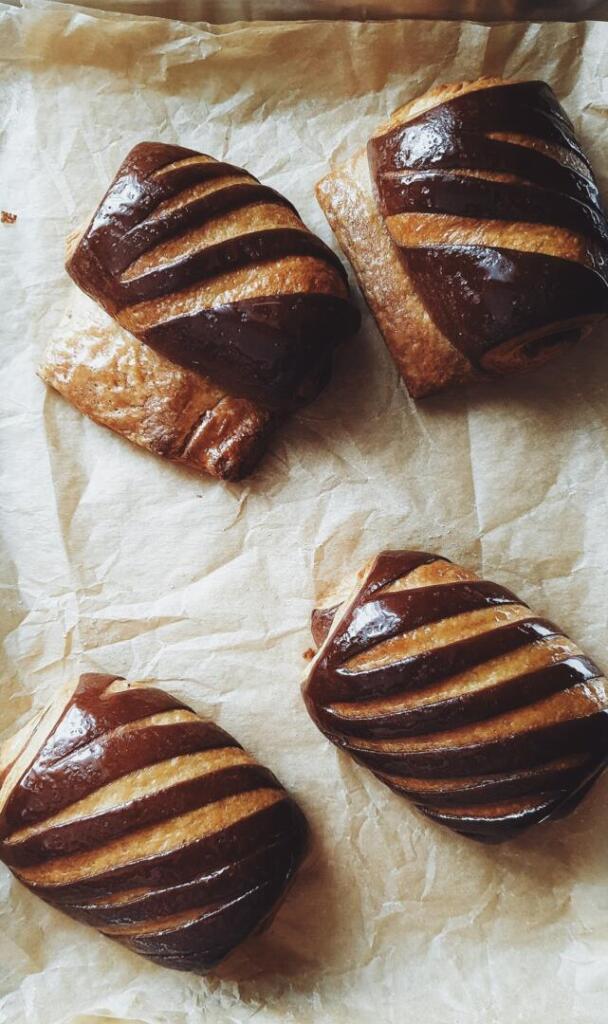
Se si fanno i pan au chocolat, girarli col lato al cioccolato verso di voi e, con una lametta o un coltello affilato, praticare delle incisioni diagonali su tutta la lunghezza, avendo cura di incidere solo l’impasto scuro. Disporre poi anche quelli su una placca, coperti con pellicola, e metterli in frigo 15 minuti.

Riprendere i croissants o i pan au chocolat, disporre al centro di ognuno qualche pezzetto di cioccolato ed arrotolarli su se stessi, disponendoli su una placca foderata con carta forno. Metterli a lievitare nel forno spento (se fa freddo, aggiungere una bacinella piena di acqua bollente sul fondo del forno, così creerà un ambiente umido e caldo).
Il tempo di lievitazione dipende dall’ambiente. Per capire se sono pronti, scuotere leggermente la teglia: se traballano come fossero gelatinosi, sono pronti.
Toglierli dal forno e preriscaldarlo a 195°C.
Infornare nella parte centrale per 20 minuti circa.
LUCIDARE
Mentre i dolci cuociono, preparare lo sciroppo semplicemente facendo sciogliere lo zucchero nell’acqua e scaldando il tutto fin quasi a bollore.
Appena i dolci sono cotti, spennellare immediatamente lo sciroppo sulla superficie.

ENGLISH VERSION
BICOLOR CHOCOLATE CROISSANTS/PAINS AU CHOCOLAT (makes 4 pains au chocolat and 8-9 croissants)
Ingredients
for the plain dough
500 g bread flour (12.5-13% protein)
50 g sugar
10 g kosher salt
9 g instant dry yeast
160 g full fat milk
140 g water, luckwarm
for the dark dough
20% of the plain dough
1 tbs unsweetened cocoa powder
1 tbs full fat milk
For the filling
Dark chocolate sticks
for the syrup
30 g water
45 g sugar
for the lamination
250 g butter (82% fat)
Method
** the day before **
PLAIN DOUGH
Add all the dry ingredients in the bowl of your stand mixer (fitted with the hook attachment). on medium speed, add the water and then the milk, gradually.
Knead on medium speed for 5-6 minutes. Once you have a nice and smooth texture (and the bowl is “clean”, which means no dough on the bowl, all on the hook) remove it from the bowl and, using a scale, take off about 20% of the dough to color it. Take the big plain dough, knead it 30 secs, put it in a bowl covered with cling film and put it in the fridge.
In a small bowl, mix together the cocoa powder and the milk untilyou get a smooth paste (add just a tiny bit of milk if you need it). Add the cocoa paste in the bowl of the stand mixer with the small dough amount and start kneading until everything it’s incorporated.
Once ready the the dough out of the mixer, knead it briefly, then put it in a bowl, cover with cling film and put it in the fridge. Both doughs should rest overnight in the fridge.
PREP THE BUTTER SHEET FOR LAMINATION
Take the 250 g of butter you’ll need for the lamination. cut it in thivk slices and place them in a rough square in the center of a parchment paper. Cover it with another parchment paper, then press it with the help of your rolling pin until you get a thin, squared butter sheet. Fold the edges of the papers to close the butter in them and put it in the fridge until the next day.
** the next day **
Take the plain dough out of the fridge. Gently roll the dough helping you with a bit of flour, if needed, to form a perfect rectangle. The rectangle should be same size of the butter sheet on the smaller side and double the size of the butter sheet on the longer one. If you have a 15 x 15 cm butter sheet, then your dough should mesure about 15 x 30 cm.
Cover the dough in cling film, put it on a tray and let it rest in the fridge for 5 minutes.
Once both the dough and butter sheet are chilled , envelope the butter between the dough and seal with pressure, to secure butter inside the dough.
Roll now your dough into a long rectangle (only lenghtwise, it’s important) and roll it until you have a 5-6 mm thickness. Trimm a bit the short sides of the dough if they are not even, and then perform a double fold. You can see exactly how to do this HERE (it’s the exact procedure for the all process, also for the single fold you’ll need to perform later).
Remove the excess flour if you need to, put the dough back on the tray, covered in cling film, and let it rest 30 minutes in the fridge.
Once chilled, take it out of the fridge and, keeping the sealing side on the right, give it another stretch, always lengthwise, but this time you’re going to perform only a single fold.
Back again in the fridge, always covered, for another 30 minutes.
FINAL ROLLING
Once rested, take the plain and the chocolate dough out of the fridge. Roll the chocolate dough the same size of the plain dough (it should be something around a a4 paper size), then transfer the dark dough onto the plain one and roll them together.
Now you can roll both directions , until you have a dough of 4-5 mm thick. The rectangle you get should mesure about 28-30 cm x 60-65 cm.
If you want to make croissants, you can follow now this pattern for the cutting part:
If you want to make pains au chocolat, follow this one:
[for pain au chocolat, once cutted in rectangles, turn the dough dark side up an make some incisions diagonally, cutting only the dark dough with the help of a razor blade or a sharp knife.
Turn them, then, dark side down when you fill them with chocolate and then roll them up. When you fill and roll the pains au chocolat, try to touch these incisions the less you can]
Once you cut both croissants triangles or pain au chocolat, it’s better to chill them a bit before form them. The fridge is your huge ally because you need to prevent butter from melting and getting into the dough, instead of creating air pockets/lamination during the baking process. So, every time you feel like to, take your time and chill the dough before going on.
FINAL PROOVING AND BAKING
Once your pastries are made, transfer them on the baking tray lined with parchment paper. Add some boiling water in a heatproof bowl and put it in the oven with the pastries. Let them proof until, shaking gently the baking they, they are jiggly and fluffy.
Remove pastries and bowl from the oven and preheat it to 185°C (365°F).
Bake them for aout 20 minutes.
While they are baking, make the syrup you’ll use to brush croissants once they’re baked. Simply add sugar and water in a small saucepan and cook until the sugar is completely dissolved. As you take the pastries out of the oven, immediately brush them with the syrup.